Segments controller
The first section
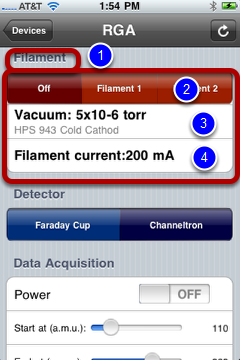
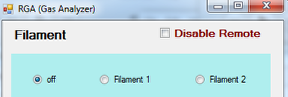
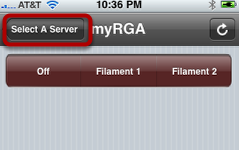
In the RGA view (above), the first section has a "Filament" title (1) and three rows (2, 3 and 4). The first row is a segments controller. The second and third rows are the default controller used in our Demo 1 example. Here, we will go over the segments controller in greater detail. This particular segments controller has three buttons. We will recreate them in our "myRGA" iPhone view. First, let's focus on the segments controller itself.
Section title
Now let's get back to iQuipment PC. Right click the "title node" under the "section node" and enter "Filament."
The segments color
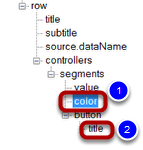
Right click on the color node (1) to select a color from the color palette.
Add two more buttons for the segments control
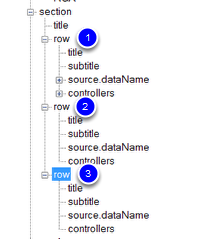
Since this segments control has three buttons, we need to add 2 more buttons. Right click on the "segments" node and select "add button" twice. Now you should see three rows for section 1 as shown above.
Enter title for each button
Since this segments controller has three buttons, we need to add two more buttons. Right click on the "segments" node and select "add button" twice. Now you should see three buttons under the "segment" node as shown above.
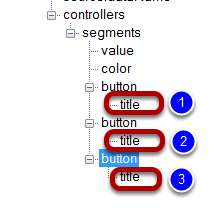
Right click the first button title node (1) and enter "Off" in the pop-up. Do the same for the second (2) and third (3) buttons and enter "Filament 1" and "Filament 2" for the titles, respectively.
Don't forget to save the iPhone view.
Test the view
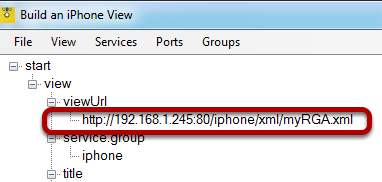
Click the viewUrl view to expand it.
Enter the URL into the iQuipment (iPhone App).
Voilà, the first row of section 1
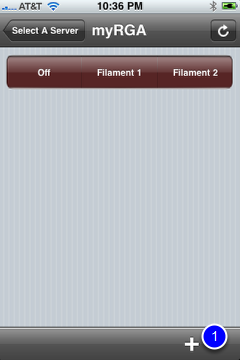
On your iPhone, you should see a view like the one shown above, but displaying your color choice.
Tap the "+" (1) to bookmark this view so that you won't have to retype the URL for this iPhone view.
Try to monitor or remotely control the "filament" radio button. It doesn’t work!
If you now try to tap the segments on your iPhone to remotely control the "Filament" radio button status (off, Filament 1 or Filament 2) in the RGA Example, it won't work because we haven't completed one important step. We must connect the segment control to the RGA Example program.
Connect the segments controller (of iPhone view) to the RGA example.exe (Windows app)
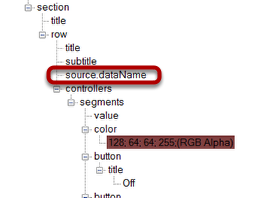
Right click the "source.dataName" and select "filament" from the pull-down list.
***Important*** Don't forget to SAVE!
Reload the iPhone view
In order to reload the updated iPhone view, tap the "Select A Server" button.
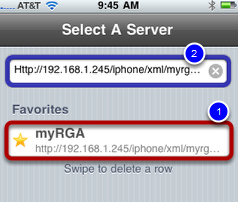
Tap myRGA (1) on Favorites. If you missed the step to bookmark "myRGA" view," just tap the textFiled (2) again, then tap the "Go" key on your keyboard.
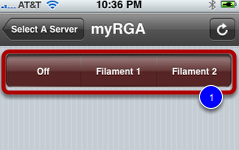
Now you can remote control the radio button.
Tap the segments in myRGA view and see if the radio button on the RGA Example.exe switches.
Now you can remotely control the radio button.
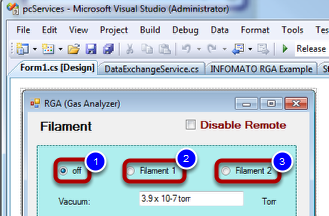
At this point in our test drive, let's take some time to look under the hood. Launch the RGA Example.sln (Visual Studio solution file). Open the Form1.cs and view it in design view. Double click the "off" radio button (1) and Visual Studio will jump to the following code:
private void radioButton_filamentOff_CheckedChanged(object sender, EventArgs e)
{
if (((RadioButton)sender).Checked)
{
string value = "off";
INFOMATO.WCF.DataExchangeService.servicePostData("RGA", "filament", value);
}
}
The radioButton_filamentOff_CheckedChanged is self-generated by Visual Studio. This function is executed whenever the status of the "off" radio button changes from checked to unchecked, or vice-versa. We simply add an “if” statement saying that if the "off" radio button is checked, notify iQuipment PC of the value for "RGA.""Filament" is now "off."
Double click on the "Filament 1" and "Filament 2" radio boxes. You will find a similar arrangement.
*** Important *** In the above code for all three radio buttons, the second variable in servicePostData function, must match one of the strings (1) in the segments buttons.
How are the radio buttons exposed for REMOTE CONTROL?
For your iPhone to set the Filament radio buttons on iQuipment PC.exe, we need to implement the following:
1. Implement clientSetDataEvent event handling;
2. Windows UI thread-safe handling.
Remote control: Implement clientSetDataEvent delegate
Launch the RGA Example.sln in the "RGA Example Project" folder (Start Menu > All Programs > iQuipment > Examples). Open the From1.cs file in design view.
When you tap one of the "filament" segments buttons on your iPhone, it fires the clientSetDataEvent. If you are not familiar with Windows event handling, we will show you now.
Enter INFOMATO.WCF.DataExchangeService.clientSetDataEvent+=
in your code, then hit the "Tab" key twice on the keyboard. Visual Studio will fill in the remaining code for you as follows
INFOMATO.WCF.DataExchangeService.clientSetDataEvent+=new INFOMATO.WCF.DataExchangeService.ClientSetDataDelegate(DataExchangeService_clientSetDataEvent);
void DataExchangeService_clientSetDataEvent(string viewName, string dataName, object dataValue)
{
throw new ....
}
The event will be handled in the function DataExchangeService_clientSetDataEvent. The event provides the values of three parameters. In the example, viewName is "myRGA", dataName is "filament" and value is either "off," "filament 1," or "filament 2," depending which button you tap on the iPhone.
Now comment out the line "throw new ...." and enter:
if (viewName.ToLower() == "RGA".ToLower())
{
switch (dataName.ToLower())
{
//*** to lower case ***
case "filament":
this.updateFilamentRadioButton(dataValue.ToString());
break;
...
...
}
}
In the function updateFilamentRadioButton, we will set the radio buttons on RGA Example.exe in a thread-safe manner.
Thread-safe handling of a Windows UI value
Every time you change a Windows UI value from code (not by a user), your program should make sure it is on the UI thread. If this concept is not familiar to you, no matter. Just pay attention to the if (this.InvokeRequired) code block below.
private void updateFilamentRadioButton(string selectedText)
{
//---- UI Thread safe consideration ----
if (this.InvokeRequired)
{
MethodInvoker del = delegate
{
updateFilamentRadioButton(selectedText);
};
this.Invoke(del);
}
//---- End of UI Thread safe consideration --------
else
{
//determine which radio button to check based on the value of selectedText
if (selectedText.ToLower() == radioButton_filamentOff.Text.ToLower())
radioButton_filamentOff.Checked = true;
else if (selectedText.ToLower() == radioButton_filament1.Text.ToLower())
radioButton_filament1.Checked = true;
else if (selectedText.ToLower() == radioButton_filament2.Text.ToLower())
radioButton_filament2.Checked = true;
}
}
The if (this.InvokeRequired) block is basically checking whether the thread is a UI thread after the event is fired. If not a UI thread, it asks to put the execution of the updateFilamentRadioButton function back in the queue. The else block is where the radio button status is altered.
Finish Section 1
The two remaining rows in Section 1 are of the default controller type, as discussed at length in the Demo 1 example.
Right click on the "section" node and select "add row" twice. Now you have two extra rows for this section. Can you fill in the rows? If you get stuck, you can either review the Demo 1 example again, or open up the RGA.xml example in iQuipment PC to see how it was done. After that, open myRGA.xml to resume.
Finish Section 2
Section 2 has only one row of the default controller type. Can you build the view following the same procedure here?