Switch controller
The section 3 of the RGA iPhone View
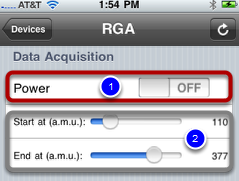
In the "RGA" iPhone view, section 3 has three rows. The first row (1) is a switch controller and the second and third rows (2) are slider controllers. We will recreate them in our "myRGA" iPhone view. First, let's focus on the switch controller.
Add a new section
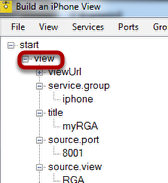
Right click the "view" node then select "add section." Right click the "title" node of the new "section" node and enter "Data Acquisition" in the pop-up.
Add switch controller
Right click the control and select "add switch."
Add switch title
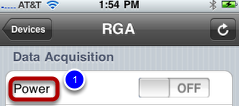
In the example, the tile of the switch is "Power"(1). Let's add it to our switch controller.
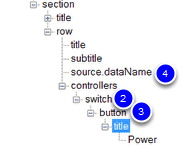
Expand the "switch" node (2) then the "button" node (3). Right click the "title” node under the "switch" node, then enter "Power" into the pop-up. It should look like the example above when complete.
Connect the switch controller (of iPhone view) to the RGA example.exe (Windows app)
To connect the switch to the "power" checkbox in RGA example.exe, right click the "source.dataName" node (4), then select "power" from the pull-down list.
Save, reload, and test
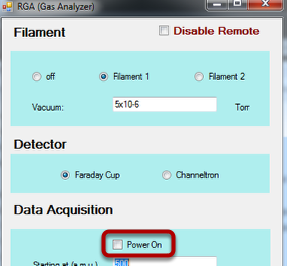
Save myRGA.xml, reload the iPhone view, and then test it on your iPhone. Now you should be able tap the switch and remotely control the "Power On" checkbox on the RGA Example.exe.
How is the "Power On" checkbox variable exposed for MONITORING?
Double click on the Form1.cs file in the RGA Example, Visual Studio project. It will jump to the following function:
private void checkBox_power_CheckedChanged(object sender, EventArgs e)
{
INFOMATO.WCF.DataExchangeService.servicePostData("RGA", "power", checkBox_power.Checked);
//checkBox_power is the name of the checkbox
}
Every time the status of the PowerOn checkBox changes, the function checkBox_power_CheckedChanged is executed. So we want to inform iQuipment PC whether the "Power" dataName in "RGA" view is now True(checked) or False(unchecked). When we were configuring the switch controller for "myRGA" iPhone view, "power” was available on the pull-down list. This is because we called servicePostData to register the "RGA" view and the "power" dataName. Again, you can name the view and dataName whatever you wish, so long as the combination reminds you of the "Power On" checkbox in the PC program.
How is the "Power On" checkbox variable exposed for REMOTE CONTROL?
Similar to our handling of the segments controller, when you tap the "Power On" switch on your iPhone, it will trigger the event INFOMATO.WCF.DataExchangeService.clientSetDataEvent. This, in turn, calls DataExchangeService_clientSetDataEvent for event handling.
void DataExchangeService_clientSetDataEvent(string viewName, string dataName, object dataValue)
{
if (viewName.ToLower() == "RGA".ToLower())
{
switch (dataName.ToLower())
{
...
case "power":
this.UpdateCheckBox(this.checkBox_power, (bool)dataValue);
break;
...
}
}
}
If you dig into the UpdateCheckBox(this.checkBox_power, (bool)dataValue) function, you will see how we take care of the UI thread-safe issue when updating the "Power On" checkBox status. UI thread-safe issues are discussed in greater detail in the segment controller section.