How to remotely control my Windows app from anywhere
By providing a unique, static identity for your PC on the Internet even with a home ADSL or cable connection.
Intranet (firewall) vs. Internet network
In order for you to monitor and/or remotely control your PC program using an IPhone from ANYWHERE, your PC needs to be reachable from the Internet. Typically, your PC is connected to a router on an intranet network at work or at home. The IP address is only valid within that particular Intranet. This is analogous to a mail stop within a corporation. You can send internal corporate mail (similar to an intranet) by mail stop. But if you try to send the same mail via the postal service (similar to the Internet), the mailman won't have any idea how to deliver it.
What needs to be done
At work, you need to get help from your IT support. Here, we will focus on the home network.
The issues that we will address are as follows:
1. Getting a static intranet IP from a router
2. Setting up port forwarding from the router to your PC
3. Dealing with a dynamic IP from your ISP
Using a browser, open up your router's administrative page by typing the appropriate IP address(such as http://192.168.1.1/, http://192.168.0.1/, or http://10.0.0.1, depending on the router model). After login (provided that you remember the correct password!), find the term related to network setup, then proceed with the steps below.
For a more details about router setup, visit this link.
Static intranet IP for your PC
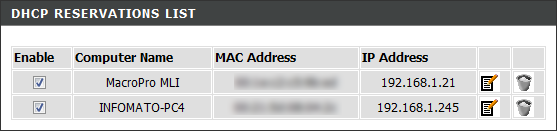
Typically, your home router dynamically assigns an IP to your PC every time you reboot your PC or router. This is not ideal because you will need to go through the setup every time these events occur. To avoid this redundant process, you need a static IP. On the router administrative page, find the term DHCP. Look for the term "reserve" or "static," to set a fixed IP for your PC. If your router does not provide this option, more complex options are detailed here
Router port forwarding
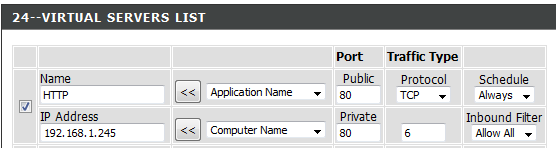
At home, you router has an Internet IP obtained from your internet service provider via an ADSL / Cable modem. This makes it possible for your iPhone to send a request to your PC only if your router can forward the port 80 http request to your PC. Look for the term "virtual servers" (see example above) or "port-forwarding." Set the application name to http, port 80, Protocol TCP. The IP address should be the static IP of your PC.
Free domain Name for your ISP dynamic IP
After setting up port forwarding, your computer server can accept http requests from anywhere with a WiFi or phone network connection. However, there is still an issue. Since your ISP dynamically assigns this Internet IP, you must keep track of this ever-changing IP in order to send the request to the correct address. This is analogous to trying to call a good friend who changes her cell phone number all the time. It’s a pain!
Luckily, there are free solutions for this problem. Companies like dyndns.com provide FREE sub-domain name registration so that you can track your dynamic IP. How does this work? You can go to DynDns.com to register a sub-domain name like "yourName.dysDojo.com." You then download and install an IP updater client on your PC. The updater sends your current Internet IP (assigned by your ISP) to the DynDns.com's server. Your http request always goes to http://yourName.dynDojo.com/.../ and DynDns.com's server will then forward the request to your PC's correct IP. In other words, the software agent does the tracking of the dynamic IP for you.
The URL for your iPhone view
After you set up the free domain name, keep iQuipment PC running. Open Safari on your iPhone and enter http://yourName.dysDojo.com/hello/. If all goes well, you should see the message "Hello, iQuipment PC is now connected to your iPhone."
From now on, you should replace the local IP in the URL of an iPhone view with yourName.dysDojo.com. For example, if the URL for the Demo1 view is http://192.168.1.245/iPhone/xml/demo1.xml you should instead enter http://yourDomainName.dysDojo.com/iPhone/xml/demo1.xml.