Initialize INFOMATO.WCF in your Program.cs file
INFOMATO.WCF is a library that bridges between your Windows code and the user actions on an Apple mobile device.
Open the Program.cs file
After referencing INFOMATO.WCF, open Program.cs in the Demo 1 project.
Add code
Do you see the code that is wrapped in stars (//************* Add me ****************)? This is the code that needs to be added to the Program.cs file in your project.
Set Data Source Port
Pay attention to the lines
INFOMATO.WCF.NetTcpService myserviceHost = new INFOMATO.WCF.NetTcpService();
myserviceHost.Open(8001);
The number 8001 is the Data Source Port. Jot down this number because you will need it later. You are free to choose a different port number preferably larger than 8001, but unless there is a port conflict, you should use this port number for your project.
Test run Demo 1 (or your project).
The proceeding steps will now try to communicate with this program. Make sure that it is running and not paused at any point if you are running in Visual Studio's debugger mode.
Communication exception error?
If you encounter an error at myserviceHost.Open(); indicating "The service endpoint failed to listen on the URI 'net.tcp://...," it is most likely due to a missing administrative right. We will now show you how to gain this access.
Grant administrative right
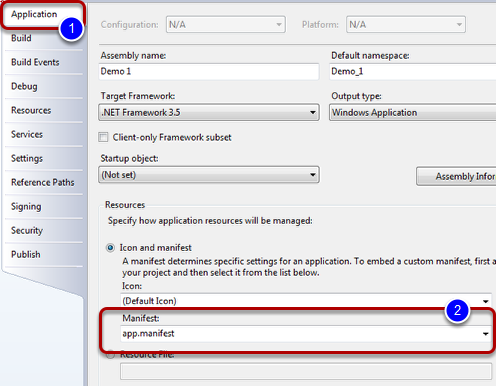
First, add the app.manifiest file (in the "files to include" folder in the "Examples" folder) to Demo 1 (or your application) if it does not have one. In this file, the line below
<requestedExecutionLevel level="requireAdministrator" uiAccess="false" />
tells the OS that this application needs administrative right in order to execute. Next, in the project properties, "Application" tab (1) "Manifest" pull down (2), select app.manifest.