Configure a view (UI) for iPhone
Now you will learn how to configure a very simple iPhone view with one section and one row.
What are sections and rows in an iPhone view?
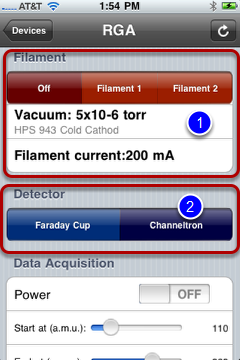
We will build up "sections" and "rows" for our iPhone view. Let's quickly go over what they are. An iPhone view typically consists of several sections. Each sections may contains several rows. In the above example, the first section (1) has the title "Filament" and contains three rows. The second section (2) has the title "Detector" and contains only one row. We will revisit the above example later.
Ready to build an iPhone view
Do you see the "start" node? It is the root of a tree node. Right click and select "add view." In this part of the application,
1. RIGHT-clicking generally allows you to see an option menu and,
2. LEFT-clicking lets you select a menu item, or condense or expand a tree node.
Connect to Demo 1 (or your project) from iQuipment PC
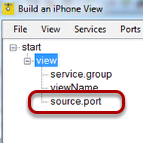
Right click on "source.port," and click the "Connect" button.
Issue? Is Demo 1 (or your Windows project) running?
If you encounter a pop-up that reads "...trying to connect the service at ...," the most likely problem is that the Demo 1 program is not running. This means that when iQuipment PC tried to communicate with the program, it failed.
If this is the case, execute the Demo 1 program (or your program), then right click the "source.port" node and click the "connect" button again.
If Demo 1 has been running and the problem still occurs, make sure the port numbers in iQuipment and the Demo 1 program are the same. There is also a small chance that other program in your PC is using port 8001. Try to select a different port number (for example 8011) and use it in both the Demo 1 and iQuipment PC. Repeat this step.
Select a Data View
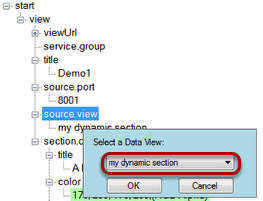
If all goes well, you should see a pop-up that allows you to select a view from the pull-down menu. Since we’ve only assigned one view named "my dynamic section" (remember when we exposed the first textBox variable in Demo 1?), you should find only "my dynamic section" on the list. Select it.
Create a section
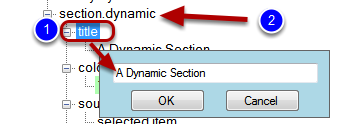
Now let's get back to iQuipment PC. Right click the "title node" (1) under the "section.dynamic" node (2). You may enter or modify the title on the po-pup.
You may have notice that the above section is a dynamic section. This indicates that this section's content is delivered during run-time from Demo1.exe. In contrast, the appearance of a regular "section" is pre-detetermined during the configuration of the XML file.
Dynamic section's content
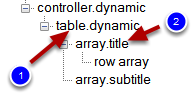
Under “table.dynamic” node (2), identify the "table.dynamic” node. Right click "array.title" (1). You should see a pop-up, where you can select an exposed variable from the pull-down. Select "row array." This is the exposed variable that will deliver the string "Apple; Orange; Banana."
If you recall, we exposed this variable in Demo 1 project and linked it to the first textBox, as shown in the code below.
private void textBox1_TextChanged(object sender, EventArgs e)
{
INFOMATO.WCF.DataExchangeService.servicePostData(myViewName, dataName_rowArray, textBox1.Text); //exposed and update variable dataName_rowArray;
}
That is why when you modify the items in the first textBox, the string will be used to construct table rows here. Make sure you tap the "refresh" button on the top right corner to update the changes you made.
Send the tapped row value
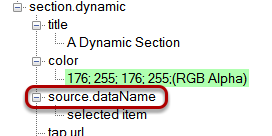
Right click the "source.dataName" under the "section.dynamic" node, In the pop-up, you may select an exposed variable. Select "selected item." This instruct iQuipment PC to pass on the tapped row value to this variable. You may recall this variable is linked to the second textBox value in the Form.cs. When you tap a row, the row title is assigned to this variable that triggers a client set data event to update the second textBox value.
Given a title to this iPhone view
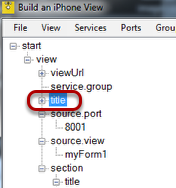
We are almost ready for the iPhone, but we must first give a title to the iPhone view we just created. We can use the name used in source.view, but it is not mandatory. For our purposes, let's just call it Demo1. Right click the "tile" node under the "view" node, then enter "Demo1" on the pop-up.
Add a new group name.

Our iPhone view will now get a URL. If we create a group name, the url will have a format like http://{sever name}/{group name}/xml/{view name}. Having a group name is helpful because it gives us an idea of what this url is for. Let's create a group name called “iPhone” so that we know the URL is related to iPhone.
Click the "Groups" menu and select "Create a Group" from the menu items. Enter "iPhone" on the pop-up.
Assign the iPhone view a group name.
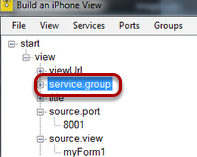
Right click the "service group" node under the "view" node. Select "iPhone" from the pull down.
The url for the iPhone view
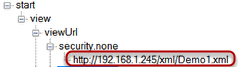
Click on the “viewUrl” node to expand the node to show the URL for our iPhone view. The node security.none indicates the communication is not encrypted.
Later you may want to configure the communication over a secure HTTPS channel. Go to the "Help" menu, select "Summary" to view details.